Ever hit “swap” and watched your transaction fail? Or maybe it went through, but you got way less than expected?
That frustrating moment usually comes down to one thing: slippage tolerance. Get it right, and your trades go through smoothly at fair prices. Get it wrong, and you’re either stuck with failed transactions or paying more than you should.
In this guide, we’ll break down exactly what slippage tolerance is, why it matters, and how CROPR’s Multi-DEX Trading helps you manage trades effectively. By leveraging CROPR’s powerful features, you can ensure fast, successful, and secure swaps while managing a cross-chain portfolio and making the most of yield opportunities.
What slippage tolerance does?
When you press “swap,” you see a quote; the trade executes a few seconds later. Prices move, blocks get busy, and your fill may differ. Slippage tolerance is the max drift you accept.
- Minimum received = Quoted amount × (1 − slippage%)
If the quote is 10.0 TOKEN and slippage is 0.5%, the swap proceeds only if you receive ≥ 9.95 TOKEN.
- Too low → more reverts.
- Too high → faster fills but weaker price protection.
The job is to balance success rate and price protection for your pair, venue, and chain.
Why slippage matters more in a multi-chain, multi-DEX world?
Here’s something important: the same trading pair behaves completely differently depending on where you trade it.
- PancakeSwap on BNB doesn’t feel like Curve on Ethereum.
And when you’re managing across wallets and chains, a single failed leg can stall a rebalance, a staking entry, or a yield move.
This is exactly why CROPR integrates trading across Uniswap, Sushi, PancakeSwap, Dodo, Curve, Aerodrom, and Balancer into one place with multi-DEX trading so you can pick the venue that suits the trade before executing it. After execution, use transaction tracking to confirm the fill and make sure your multi-wallet cross-chain portfolio view lines up with reality.
Practical slippage ranges for optimized swap execution
What we are about to share are practical, pair-type baselines. They’re starting points you can adapt based on trade size, pool depth, and block conditions.
Stable ↔ Stable (USDC/USDT, DAI/USDC): 0.05%–0.30%
If swaps revert at busy times, nudge slightly higher.
Blue chips (ETH/USDC, BTC/ETH): 0.30%–0.80%
Lean higher around volatile hours.
Mid/long-tail tokens: 1.0%–3.0%
If price impact looks high, reduce size before raising tolerance.
Illiquid/microcaps: 3.0%–8.0%
Use smaller batches and compare venues in multi-DEX trading before widening.
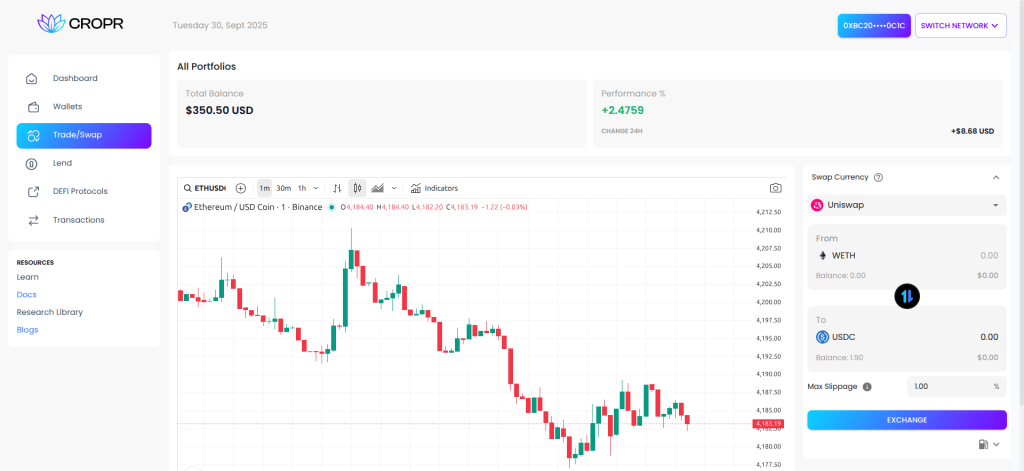
How Slippage Tolerance Impacts Your Trades in CROPR
- Pick the venue first (Multi-DEX Trading)
Select your pair and compare the supported DEXs. Start with the venue showing better expected output and lower price impact for your order size.
- Set a sensible starting point
- Stable ↔ stable: start tight (small %).
- Blue chips (e.g., ETH/USDC): moderate.
- Long-tail / thin pools: wider, but still reasonable.
These are baselines, adjust after you see the quote and price impact.
- Match size to depth
If preview shows noticeable impact, reduce size or split the order before raising slippage. Big orders in shallow pools hurt more than “extra” tolerance helps.
- Set the deadline and sanity-check “Minimum received”
Short deadlines reduce stale mempool risk. Confirm the minimum received is acceptable before you submit.
- Execute, then verify
Open Transaction Tracking to confirm filled amount and cost so portfolio state matches on-chain reality across wallets and networks.
- If it fails, change one thing at a time
Try another supported DEX first. If it still fails, nudge slippage. If impact is high, shrink size instead of widening tolerance.
Rule of thumb: venue → baseline → size check → confirm → verify.
Slippage is a control you set on purpose, not a guess you make under pressure.
Where slippage quietly impacts your swaps
In CROPR, slippage tolerance plays a key role in optimizing your trades across multiple DEXs. Let’s look at how it affects key features.
Rebalances (Multi-Chain Portfolio Cockpit)
For major assets, keep slippage low to avoid unnecessary drag. If a swap fails, try another DEX before adjusting slippage.
Staking
When swapping for staking (ETH, POL, AVAX, BNB), set an appropriate slippage to ensure a fair price, especially during network events.
Yield Deployments
When entering lending or AMM pools, adjust slippage based on pool size. Smaller pools may require reducing order size instead of widening slippage.
Cross-Chain Bridging
Keep slippage modest during cross-chain transfers, particularly if liquidity is low, and confirm each leg to ensure consistency.
Fiat On-Ramp
For your first post-on-ramp swap, stick to blue-chip tokens and avoid over-widening slippage just to complete the trade.
In every case, pick venue first, then set slippage.
What this means for your swaps in CROPR
Treat slippage as a deliberate pricing decision, not a checkbox. The goal isn’t to push trades through at any cost, it’s to clear at prices you can defend. Start from what the market can absorb, choose the venue that supports it, and size your order so you don’t have to overcompensate with tolerance. When conditions change, adjust with intent, not impatience.
If you apply that mindset, CROPR becomes a control panel, not a slot machine: compare routes, commit with a tolerance you can justify, and move on to the next allocation with confidence. That’s how you keep swaps fast while protecting your edge over weeks and months, not just one transaction.
Want your swaps to clear smoothly without guessing slippage every time? Join the CROPR Beta and get a smarter, optimized trading experience across chains and DEXs.